Information Computer

Saturday, January 28, 2012

Remove Navbar Blogger Permanent

we already know that some bloggers do not like the navbar at the top of the blog. with a variety of reasons they wanted to remove the navbar. and maybe we have understood about one way of eliminating the navbar. namely by providing css display: none or visibility: hidden on navbar id selector. how these can indeed eliminate the navbar. more precisely the way it used to hide the navbar instead of removing them.

Next I had a way to completely remove the navbar in blogger permanently. a benefit if we remove the navbar permanently are:
- Parse load blog
- Make the blog more SEO-friendly

how to remove navbar following permanently:

1. loggin to blogger.
2. click Design - Edit HTML.
3. Find ]]>
4. place the following code after the code ]]>.

<script type='text/javascript'>
<![CDATA[
<!--
/*<body>
*/
-->
]]>
</script>

5. Save Template
6. Finish

very simple right? I hope this article is very useful for us all. thank bloggers.
READ MORE >> Remove Navbar Blogger Permanent

Network Monitoring Software

protecting the valuable information it is very important. much less information is highly confidential for many people. on a network term that hackers and others familiar things. is therefore very important for us to keep the information we have on the network with network monitoring software.

network monitoring software is usually used to check or Monitor state-owned network that any data sent to the destination and the absence of data theft is often called by sniffing. therefore the network monitoring software can also save the data we have from hackers or sniffer.

I do not know how the network monitoring software which is great to use but maybe I have a bit of advice / recommendation from me on behalf of the network monitoring software. there are 2 network monitoring software that you can use.

1. Net Tools 5

Net tools 5 is a network monitoring software that I have a lot of features. so complete network monitoring software also has features that lead to hacking equipment. very friendly interface that makes us easy to use. please your own experiment with this network monitoring software.

2. MyLanViewer

MyLanViewer is a network monitoring software that also allow you to monitor your network. MyLanViewer you can use for network scanner and IP monitor for your network. This software is suitable for you who are in the development of network science like me. as well as network monitoring software that had been MylanViewer also have a user-friendly interface. so it is very easy for you to try yourself.

hopefully useful for you. thank you very much and good luck.
READ MORE >> Network Monitoring Software

Saturday, January 21, 2012

Anti Spam Appliance

everyone would know what it is email. email millions scattered in the Internet network. some say 75% of the emails that we get is spam. What do you know what it is spam? spam is the use of electronic equipment to transmit messages in repeatedly without desired by the owner. and spam it like garbage. is not very useful for us. how do I fix this? we can try to use anti-spam appliance. following some anti-spam appliance that you can try.


--- for email users ---


1 0spam.com, - For users of POP3 Mail.

So far this is the easiest and effective solution for anyone with a POP3 email ID. For example you@aol.com. 0Spam.com is a web-based service that takes all your emails for you and send you only email from the email IDs of pre-authenticated by you. This means, no one cansend email you unless you give prior permission.

2 SpamPal, -. The Desktop Solutions SpamPal is a program that sits between your email client and your mailbox, checking your email as you retrieve it.
Any email messages that SpamPal will consider to be trash "tag" with a special header; you simply configure your email client to filter anything with this header into a separate folder and Spam will not be mixed with the rest of your email anymore!


--- for website owners ---


1 Form Encoder, - Simple Solution for Webmasters.

One way to protect yourself is to "encode" your address, Form encoder will encrypt your email address and convert it to JavaScript, hiding from robots harvesting email crawlthe web address for the affected.

Simply copy and paste this JavaScript into your web page where you want to email it to appear.

2 Teachers spambot Buster, -. A CGI Solution Researching Teacher spambot Buster stops robots harvesting email addresses from your web page. But this script is nothing more than that! It really stopped harvesting email addresses from:
This is a great software released by willmaster.com

3 NATATA Anti-Spam Encoder - Desktop Solutions

This program searches for email addresses both from all your web pages or single pages and encode them all in a matter of minutes automatically. HTML coding and no pure Java is used.
You do not need to be technically savvy to use it because it automatically insert code into your web page. In 2 minutes you can completely encrypt all your web pages.

-- good luck --
READ MORE >> Anti Spam Appliance

Packet Tracer Tutorial

Packet Tracer Tutorial
packet tracer tutorial is here. packet tracer tutorial here, although not perfect, but with time I will complete this blog with a lot of tutorial packet tracer. packet tracer is software that helps us in designing a network. packet tracer tutorial so this may be needed by some people who are learning the network or packet tracer.

packet tracer tutorial here can be found in http://computer-unu.blogspot.com/search/label/packet tracer. hopefully this useful tutorial packet tracer

search for :

tutorial packet tracer

READ MORE >> Packet Tracer Tutorial

Tuesday, January 17, 2012

setting modem smartfren in ubuntu

setting modem smartfren in ubuntusmartfren is the first operator in Indonesia to implement EV-DO Rev.B technology that can support fast internet access of up to 14.7 Mbps.

smartfren, a provider of CDMA technology-based telecommunications service provider in Indonesia, today confirmed its leadership position in the Indonesian telecommunications industry by expanding the use of leading-edge technology, EV-DO (Evolution Data Only / Evolution Data Optimized) Rev.B phase 2. EV-DO Rev.B technology capable of supporting fast Internet access of up to 14.7 Mbps. Previously, smartfren recorded as the first operator in Indonesia to implement EV-DO Rev.B technology by implementing the first phase of this technology - access speeds of up to 9.3 Mbps in Bali in January 2010.

now around me. friends, family, relatives smartfren many are using a modem. one time I borrowed to test the speed. I guess the same as the other modem. on ubuntu, i try connecting the modem is in a way I have ever tried. please read here. and the results failed. why? I was very confused. does not support modem smartfren?

without thinking I'm trying to find out on google. and can I conclude about how to connect the modem using wvdial. complete the following way.

1. open terminal. sudo su
2. install wvdial ( sudo apt-get install wvdial )
3. If you've installed the application virtualization like VMWare Workstation or VirtualBox, please turn off your first service virtualization applications by using the following command:

# sudo /etc/init.d/vmware stop
or
# sudo /etc/init.d/vboxdrv stop

4. Turn off networking service is also to ensure that your system is not connected to other networks:

# Ifconfig eth0 down

5. By default, evdo smartfren ZTE AC682 create a virtual CD-ROM device with the name /dev/sr1 or /dev/sr0. Eject the device by using the following command:

# eject /dev/sr1 or # eject /dev/sr0

6. Make sure you have eliminated the usb storage device such as USB Flash Drive and so on, then remove the usb-storage driver also with the following command:

# rmmod usb_storage

7. # lsusb
result : Bus 004 Device 003: ID 19d2:ffdd ONDA Communication S.p.A.
If the result is different, please unplug the modem and repeat the above steps all over again

8. Load number of parameters to the kernel usb_serial modem by typing the following command:
# Modprobe usbserial vendor = 0x19d2 product = 0xffdd

9. # wvdialconf
make sure there results the words "Found a modem on / dev/ttyUSB0".

10. edit the file /etc/wvdial.conf
# nano /etc/wvdial.conf

[Dialer smart]
Init1 = ATZ
Init2 = ATQ0 V1 E1 S0=0 &C1 &D2 +FCLASS=0
modem Type = Analog modem
Phone = #777
New PPPD = yes
ISDN = 0
Username = smart
Password = smart
modem = /dev/ttyUSB0
Baud = 460800
Command Line = ATDT
Stupid Mode = 1

11. and finally you connect with the command
# wvdial smart

good luck :)
READ MORE >> setting modem smartfren in ubuntu

Monday, January 16, 2012

DHCP Server [Packet Tracer]

DHCP is a service that automatically assigns IP numbers to
computers that request it. Computers that request IP addresses are DHCP client and a computer that provides the IP address is called DHCP server. Thus, administrators no longer need to manually provide the IP address but simply pass a reference to the DHCP server. IP address is given along with the subnet mask and default gateway.
because DHCP is one of the tasks from the server, then we need a computer server. what you already know what a computer server?

server is a computer (or a computer system) whose job it is to serve other computers. Of course, computers are serviced computers connected to the server. Thus, the server computer can function as:

- Site intenet or science
- Storage of data or files, and create a data or file can be retrieved when needed.
- Connect to the client computer to the Internet.

Many people who try to define the meaning of the word / term in conjunction with a computer server. Here are some definitions:

- The server is a computer on the Internet or on any other network that stores files and make the file available to be taken if needed.
- The server is a computer network applications that are used to serve many users in one network.
- The server is a computer system that provides a specific service type within a computer network.

in the presence of a computer server on our network. then the network we can be called by client-server network. client-server so we can interpret as a form of architecture, where the client is a device that receives that will display and run applications (computer software) and server is a device that provides and act as manager of applications, data, and safety.

let's start creating a network with a DHCP server in packet tracer. follow the instructions below.

1. open packet tracer
2. add the server computer, 1 switch and 2 PCs to our network design.

dhcp server

3. connect all the cables. and then set as shown below.
dhcp server

4. double click server0. set manual ip address server with 192.168.2.1 and subnet 255.255.255.0
5. then click config - DHCP. fill Start IP Address and Subnet as shown below.

dhcp server

6. Now the client can begin to ask for the IP address of the server computer. double-click PC0. click Desktop then click DHCP. if the results are as shown below means you have succeeded.

dhcp server

may be useful. thank's :)
READ MORE >> DHCP Server [Packet Tracer]

Saturday, January 14, 2012

Build a LAN with Wireless [Packet Tracer]

if yesterday I had to review about how to build a LAN with a switch or hub. and we already know what a LAN. this time we will also discuss other again. but the difference is now we will use the wireless media.

Wireless is a wireless technology, in this case is to have telecommunications using electromagnetic waves instead of cables. Current wireless technology is growing rapidly, can be seen by naked eye with a growing number of cellular phone usage, but it also develops wireless technology used for Internet access.

Wireless LANs using elektromagetik waves (radio and infrared) to perform data communication channel data from one point to another point without going through the physical facility. This connection uses a specific frequency to distribute the data, most of the Wireless LAN using a frequency of 2.4 GHz. Frequency is called the Industrial, Scientific and Medical Band or often called the ISM band.

A wireless access point is a wireless networking device that connects wireless clients (such as a computer equipped with a USB wireless adapter or a laptop equipped with ExpressCard wireless adapter) with a wired network is usually also can connect to the internet through it.

now its time to build a wireless LAN simulations with Packet Tracer. follow these instructions:

1. open Packet Tracer
2. click icon wireless devices , then click AccessPoint-PT. add to your worksheet.
3. double click accesspoint0 , click tab config. change the SSID on port 1 with "computer-unu"


4. then add PC devices to your work sheet.
5. double click PC0. in tab physical turn off power. then change module fast-ethernet with Linksy-WM300. note the picture below.

6.copy PC0 and design your network like this.

7. connect all PCs with a wireless access point. see the following figure.


8. and thus as follows.

9. all PCs are connected now live set IP for each PC.
PC0
IP address 192.168.2.1
subnet 255.255.255.0

PC1
IP address 192.168.2.2
subnet 255.255.255.0

PC2
IP address 192.168.2.3
subnet 255.255.255.0


From Wikipedia! 

A local area network (LAN) is a computer network that interconnects computers in a limited area such as a home, school, computer laboratory, or office building. The defining characteristics of LANs, in contrast to wide area networks (WANs), include their usually higher data-transfer rates, smaller geographic area, and lack of a need for leased telecommunication lines.


ARCNET, Token Ring and other technology standards have been used in the past, but Ethernet over twisted pair cabling, and Wi-Fi are the two most common technologies currently used to build LANs.
READ MORE >> Build a LAN with Wireless [Packet Tracer]

Friday, January 13, 2012

build a LAN with a switch / hub [Packet Tracer]

LAN (local area network) is a computer network whose network covers only a small area, such as campus computer networks, buildings, offices, in homes, schools or smaller. Today, most LAN technology based on IEEE 802.3 Ethernet using switch, which has a data transfer speed 10, 100, or 1000 Mbit / s. In addition to Ethernet technology, the current 802.11b technology (or so-called Wi-Fi) is also often used to form the LAN. Places that provide LAN connectivity with Wi-Fi technology called hotspots.

But this time we will not discuss about WiFi or Hotspot. in this post we would design a simple LAN network using a switch / hub in packet tracer. actually post this time is almost equal to that post yesterday about the peer-to-peer. networks can also be made ​​of this we call the peer-to-peer as well. the difference here now we are using a device called a switch / hub.

switch / hub is a device that brings together the network cables from each workstation, server, or other device. Usually hub-shaped box with a flip-flop lamp used cafe or office network to connect a LAN cable (RJ45). although it actually switch and hub are different.

Switch is a hardware device that allows the distribution of packet data between computers in a network and be able to identify network topologies in many layers so that the packet data can be directly to the destination.

Hub is a simple network devices. Hubs do not manage the flow of data in the network path, so each packet of data that passes through the Hub will be sent (broadcast) to all the ports that are up to the data packet to its destination. It can make the hub into collisions and slow down the network. (Hubs are also commonly known as repeaters)

Hub and Switch the difference lies on how the packet data / information sent to them are processed. When data is entered or come to the Hub, Hub will take this data and will be transmitting it to each computer connected to the network.

But that's not the switch, he will receive the data, and will only send it to the computer receiving the data concerned.

Switch will cut the use of your network bandwidth usage significantly, especially when we have a network with many computers and all busy to send and receive data at the same time. Another advantage is that data switches will be more secure from data theft by sniffer.

Switch and Hub actually has the same function, because by using one of which we still can make the Network Computer, but the use of switches will be faster than a network hub, especially if we have a very large.

Now let's start creating a network design. follow the instructions below.

1. in the 
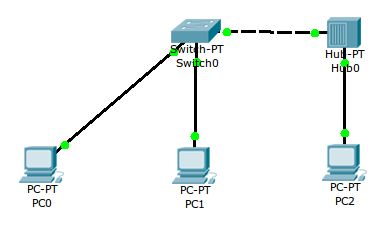
previous post we have been able to add devices PC (personal computer). Now let's add 3 PCs
2. we add a switch device (CTRL + ALT + S). then select the switch with the type "Switch-PT".


3. then add 1 device switches (CTRL + ALT + U). then select the hub with the type of "Hub-PT".


4. then plug the cable to be a design like this.


5. make sure the indicator light is green wires.
6. set the IP address and subnet each PC as follows. if you do not know how to set the IP address and subnet in packet tracer please read my post first peer-to-peer.

PC0
IP address 192.168.2.1
subnet 255.255.255.0

PC1
IP address 192.168.2.2
subnet 255.255.255.0

PC2
IP address 192.168.2.3
subnet 255.255.255.0


8. Now we will test the connection in the network we have created. click tool "add simple PDU" in the right side of the worksheets.


9. click PC0 and PC1, PC0 and PC2, PC1 and PC2.
10. if successful will appear like this. in the lower right corner of the software packet tracer


From Wikipedia! 

A local area network (LAN) is a computer network that interconnects computers in a limited area such as a home, school, computer laboratory, or office building. The defining characteristics of LANs, in contrast to wide area networks (WANs), include their usually higher data-transfer rates, smaller geographic area, and lack of a need for leased telecommunication lines.


ARCNET, Token Ring and other technology standards have been used in the past, but Ethernet over twisted pair cabling, and Wi-Fi are the two most common technologies currently used to build LANs.
READ MORE >> build a LAN with a switch / hub [Packet Tracer]

Thursday, January 12, 2012

Peer-to-Peer [Packet Tracer]

This post begins our discussion of software packet tracer. later we will learn together to discuss many things about the network with packet tracer software. for the uninitiated, is a packet tracer network simulation software manufacture. we try to start making the network simple sanat. commonly called a peer-to-peer. I think peer-to-peer is a type of network in which two or more computers connected to each other and each computer has the same level of network usage.

now let's get started. follow the instructions below.
1. open software packet tracer
2. click End Devices icon (lower left corner) or press CTRL + ALT + V
3. drag icon general (Personal Computer) and drop to worksheets.

packet tracer

4. click Connections icon or press CTRL + ALT + 0 , then click Automatically Choose Connection Type.
5. click PC0 then click PC1.

6. double click PC0.
7. Desktop tab, then click IP Configuration.
8. set IP Address for Subnet Mask.
IP Address PC0 = 192.168.2.1
Subnet Mask = 255.255.255.0

packet tracer

9. close window PC0
10. double click PC1
11. Desktop tab, then click IP Configuration.
12. set IP Address for Subnet Mask.
IP Address PC0 = 192.168.2.2
Subnet Mask = 255.255.255.0
13. Desktop tab, then click Command Prompt
14. type ping 192.168.2.1 then enter
15. if it appears as shown below, it means PC0 and PC1 are connected and successful.


sorry if this post is rather confusing. please leave a comment below. thank :)

From Wikipedia! 
Peer-to-peer (P2P) computing or networking is a distributed application architecture that partitions tasks or workloads among peers. Peers are equally privileged, equipotent participants in the application. They are said to form a peer-to-peer network of nodes.


Peers make a portion of their resources, such as processing power, disk storage or network bandwidth, directly available to other network participants, without the need for central coordination by servers or stable hosts. Peers are both suppliers and consumers of resources, in contrast to the traditional client–server model where only servers supply (send), and clients consume (receive).


The peer-to-peer application structure was popularized by file sharing systems like Napster. The concept has inspired new structures and philosophies in many areas of human interaction. Peer-to-peer networking is not restricted to technology, but covers also social processes with a peer-to-peer dynamic. In such context, social peer-to-peer processes are currently emerging throughout society.
READ MORE >> Peer-to-Peer [Packet Tracer]

Wednesday, January 11, 2012

Create a Spoiler on The Blog

In the media and the Internet, Spoiler was written explanation or information about a story, which revealed the plot. Read the explanation of a story can cause reduced pleasure to read the story, because the pleasure of reading a story usually depends on the dramatization or tension caused by the story. Usually in the mass media and the Internet, explanation is hidden in a certain way, so only read by those who want to see the explanation. that according to wikipedia.org

Spoiler it is a means used to hide a link or a collection of links, a collection of text, images, whole or in part of the blog posts and others with the use html code. The goal is to save space or space in a post or sidebar. Another advantage of using Spoiler is able to reduce the loading time, the intention is, if we use the spoiler on the image, so our blog will not be affected by the burden of loading that can be burdensome. Spoiler can also be used to hide the video so that loading is not severe.

okay not too many strings attached anymore. Let us now follow the steps below to create a spoiler on the blog.

1. Login Blogger account
2. Go to Desain > Edit HTML
3. Enter the following code above the code ]]></b:skin>

.commenthidden {display:none;}
.commentshown {display:inline;}

4. Then place the following code between the code ]]></b:skin> and</head>

<script type="text/Javascript">
function togglecomments (postid) {

var whichpost = document.getElementById(postid);

if (whichpost.className=="commentshown") { whichpost.className="commenthidden"; } else { whichpost.className="commentshown"; }

}
</script>

5. to edit the HTML in the design has been completed. please save it.
6. Now if you want to display / need spoiler post you make, you just provide the following script.

<input onclick="togglecomments('Name_spoiler')" type="submit" value="SPOILER" />
<div class="commenthidden" id="Name_spoiler">
CONTENT OF SPOILER</div>

7. replace word "SPOILER" with title of your spoiler. then replace word "CONTENT OF SPOILER" with the content you want is in the spoiler
8. if you make more than one spoiler in a post. You should notice the word "Name_spoiler". between one another spoiler must have different names. so edit the word "Name_spoiler" in another spoiler in other words.
9. finish

that's how to make spoiler. criticism and suggestions in wait. thank you very much:)

need to know! 
Blogger is a blog-publishing service that allows private or multi-user blogs with time-stamped entries. It was created by Pyra Labs, which was bought by Google in 2003. Generally, the blogs are hosted by Google at a subdomain of blogspot.com. Up until May 1, 2010 Blogger allowed users to publish blogs on other hosts, via FTP. All such blogs had (or still have) to be moved to Google's own servers, with domains other than blogspot.com allowed via Custom URLs
READ MORE >> Create a Spoiler on The Blog

Tuesday, January 10, 2012

List of blog content automatically

good evening. with this opportunity. I want to discuss more about the blog. This time the discussion regarding making an automatic table of contents in a blog widget. This widget will my well equipped with scroll facility. with scroll facility we will be able to save a place for widgets on the blog. Now follow the steps below.

1. login to your account blogger,
2. then. go to Design.
3. add a widget > HTML/JavaScript
4. copy script below.

<div style="overflow:auto; height:200px;" margin="1px" ;>
<script style="text/javascript" src="http://sites.google.com/site/icalcell/javascript/daftarisiku.js"></script><a href='http://computer-unu.blogspot.com/'><img style="border: 0" src="http://image.bloggerplugins.org/blogger-widgets.png" /></a> <script style="text/javascript">var numposts = 1000;var showpostdate = false;var showpostsummary = false;var numchars = 100;var standardstyling = true;</script><script src="http://YOURBLOG.blogspot.com/feeds/posts/default?orderby=published&alt=json-in-script&max-results=999&callback=showrecentposts"></script>
</div>

5. change text "YOURBLOG" with name of your blog.
6. save and finish :)

because it relates to a script, so it would be very fatal if there is one little writing. therefore if you try this script is then failure or error, please write a message / comment at the end of this post about what you experienced. maybe I can help with your problem and probably me as the author of this post that one can fix it immediately. I hope this post is very useful for you. thank you very much for reading my post. thank you very much:)

need to know! 
Blogger is a blog-publishing service that allows private or multi-user blogs with time-stamped entries. It was created by Pyra Labs, which was bought by Google in 2003. Generally, the blogs are hosted by Google at a subdomain of blogspot.com. Up until May 1, 2010 Blogger allowed users to publish blogs on other hosts, via FTP. All such blogs had (or still have) to be moved to Google's own servers, with domains other than blogspot.com allowed via Custom URLs
READ MORE >> List of blog content automatically

Thursday, January 5, 2012

Conversion Integer to String [QtCreator]

in the programming world is certainly very important variable. and the variable whose name is very close to the data type. in some programming language is very sensitive to the type of data.

in this post I discuss Integer and string data types. integer data type is a data type for data in the form of integers. while the string data type is a data type for data in the form of text. string data type could be worth number, but can not be calculated as arithmetic. therefore the data must first be converted to an Integer data type.

this time we try to convert the data type Integer to String and vice versa in QtCreator. follow the following steps.

1. The first example we created a variable of type int named number
int var_number = 6;

2. now convertible into QString way.
QString var_str_number= QString::number(var_number);

3. after that follows the example if you want to be converted again to the numbers.
int var_number_again = var_str_number.toint();

any question?? please comment above. good luck :)


need to know! 
Qt Creator is a cross-platform C++ integrated development environment which is part of the Qt SDK. It includes a visual debugger and an integrated GUI layout and forms designer. The editor's features includes syntax highlighting and autocompletion, but not tabs. Qt Creator uses the C++ compiler from the GNU Compiler Collection on Linux and FreeBSD. On Windows it can use MinGW or MSVC with the default install and can also use cdb when compiled from source.
READ MORE >> Conversion Integer to String [QtCreator]

Tuesday, January 3, 2012

Readmore For Blogger

The following I would like to share about making readmore for bloggers. readmore is actually not important how. readmore used to condense the content of posts displayed on the homepage.

follow the steps below.
1. login to your account blogger,
2. go to Design > Edit HTML
3. check checkbox button expand widget templates
4. CTRL + F. find <head>
5. Give the following below </head>

<script type="text/javascript">
//<![CDATA[
/******************************************
computer-unu.blogspot.com
********************************************/
function removeHtmlTag(strx,chop){
if(strx.indexOf("<")!=-1)
{
var s = strx.split("<");
for(var i=0;i<s.length;i++){
if(s[i].indexOf(">")!=-1){
s[i] = s[i].substring(s[i].indexOf(">")+1,s[i].length);
}
}
strx = s.join("");
}
chop = (chop < strx.length-1) ? chop : strx.length-2;
while(strx.charAt(chop-1)!=' ' && strx.indexOf(' ',chop)!=-1) chop++;
strx = strx.substring(0,chop-1);
return strx+'...';
}

function createSummaryAndThumb(pID){
var div = document.getElementById(pID);
var imgtag = "";
var img = div.getElementsByTagName("img");
var summ = summary_noimg;
if(img.length>=1) {
imgtag = '<span style="float:left; padding:0px 10px 5px 0px;"><img src="'+img[0].src+'" width="'+img_thumb_width+'px" height="'+img_thumb_height+'px"/></span>';
summ = summary_img;
}

var summary = imgtag + '<div>

' + removeHtmlTag(div.innerHTML,summ) + '</div>
';
div.innerHTML = summary;
}
//]]>
</script>

6. CTRL + F. find <data:post.body>
7. replace <data:post.body> with the following script.

<b:if cond="data:blog.pageType != &quot;item&quot;">
<div expr:id="&quot;summary&quot; + data:post.id">
<data:post.body></data:post.body></div>
<script type="text/javascript">
createSummaryAndThumb("summary<data:post.id/>");
</script>
<span class="rmlink" style="float: left;"><a expr:href="data:post.url" href="http://www.blogger.com/post-create.g?blogID=7103870391608312572">READ MORE &gt;&gt; <data:post.title></data:post.title></a></span>
</b:if>
<b:if cond="data:blog.pageType == &quot;item&quot;"><data:post.body></data:post.body></b:if>

8. save

good luck :)

need to know! 
Blogger is a blog-publishing service that allows private or multi-user blogs with time-stamped entries. It was created by Pyra Labs, which was bought by Google in 2003. Generally, the blogs are hosted by Google at a subdomain of blogspot.com. Up until May 1, 2010 Blogger allowed users to publish blogs on other hosts, via FTP. All such blogs had (or still have) to be moved to Google's own servers, with domains other than blogspot.com allowed via Custom URLs
READ MORE >> Readmore For Blogger

Monday, January 2, 2012

Create Local Repository

Repository is gathered somewhere package-package (linux software) that were created especially for a linux distro. its function is to facilitate the repository linux users to get a variety of packages (software). usually it is an online repository. so to get the package (software) we need an internet connection.

such as the post title above, we I will discuss about creating a local repository. if your home does not have an internet connection. This repository is very suitable and helpful for you to store software that you can from outside the home.

how the local repository, first of all packages stored in a directory. later in the scan result package.gz file. directory path and then add a local repository in the sources.list file. after that you can install the package in the repository this way actually means.

The following steps create a local repository :
1. collection of all the package that you have in a directory. for example /home/husnu/repository
2. in the repository directory create 2 directorys with name pool and dists.
3. move all the package to directory pool
4. in the dists directory create a directory with the name of husnu
5. in the husnu directory create a directory with the name of the binary-1386
6. open terminal
7. cd /home/husnu/repository
8. sudo dpkg-scanpackages pool /dev/null | gzip -9c > dists/husnu/binary-i386/Packages.gz
9. sudo gedit /etc/apt/sources.list
10. in the last line add the following code
11. deb file:///home/husnu/repository husnu
12. save
13. sudo apt-get update
14. finish

if any question, please write comment in this post. thank :)


need to know! 
Many software publishers and other organizations maintain servers on the Internet for this purpose, either free of charge or for a subscription fee. Repositories may be solely for particular programs, such as CPAN for the Perl programming language, or for an entire operating system. Operators of such repositories typically provide a package management system, tools intended to search for, install and otherwise manipulate software packages from the repositories. For example, many Linux distributions use Advanced Packaging Tool (APT), commonly found in Debian based distributions or yum, found in Red Hat based distributions. There are also multiple independent package management systems, such as pacman, used in Arch Linux and equo, found in Sabayon Linux.

As software repositories are designed to include useful packages, major repositories are designed to be malware free. If a computer is configured to use a digitally signed repository from a reputable vendor, and is coupled with an appropriate permissions system, this significantly reduces the threat of malware to these systems. As a side effect, many systems that have these capabilities do not require anti-malware software such as anti-virus software.

Most major Linux distributions have many repositories around the world that mirror the main repository.
READ MORE >> Create Local Repository

Related Post For Blogger

Related post in use to display some other post that is still associated with the main post that is being opened. give him a post linked on this so that visitors open up a lot of posts on our blog. so the goal is to increase the page view.

many, many ways that we can use to create a related post. The following is one way that we can use to create a related post.

1. Login Blogger account

2. Go to Desain > Edit HTML

3. Check option button expand widget templates

4. CTRL + F . find <data:post.body/></p> and <div style='clear: both;'/>

5. Give the following script between <data:post.body/></p> and <div style='clear: both;'/>

<!-- Related Posts Code Start-->
<b:if cond='data:blog.pageType == "item"'>
<div class='similiar'>
<div class='widget-content'>
<h3>Related Posts </h3>
<div style='overflow:auto;width:500px;height:100px;padding:10px;border:3px;background: #FFFFFF; top center;'>
<div id='data2007'/><br/><br/> <div id='Scrapur'></div><a
href='http://computer-unu.blogspot.com/2012/01/related-post-for-blogger.html'><img style="border: 0" alt="Related Posts for Blogger"
src="http://image.bloggerplugins.org/blogger-widgets.png" /></a>
<script type='text/javascript'>

var homeUrl3 = &quot;<data:blog.homepageUrl/>&quot;;
var maxNumberOfPostsPerLabel = 4;
var maxNumberOfLabels = 10;

maxNumberOfPostsPerLabel = 100;
maxNumberOfLabels = 3;


function listEntries10(json) {
var ul = document.createElement(&#39;ul&#39;);
var maxPosts = (json.feed.entry.length &lt;= maxNumberOfPostsPerLabel) ?
json.feed.entry.length : maxNumberOfPostsPerLabel;
for (var i = 0; i &lt; maxPosts; i++) {
var entry = json.feed.entry[i];
var alturl;

for (var k = 0; k &lt; entry.link.length; k++) {
if (entry.link[k].rel == &#39;alternate&#39;) {
alturl = entry.link[k].href;
break;
}
}
var li = document.createElement(&#39;li&#39;);
var a = document.createElement(&#39;a&#39;);
a.href = alturl;

if(a.href!=location.href) {
var txt = document.createTextNode(entry.title.$t);
a.appendChild(txt);
li.appendChild(a);
ul.appendChild(li);
}
}
for (var l = 0; l &lt; json.feed.link.length; l++) {
if (json.feed.link[l].rel == &#39;alternate&#39;) {
var raw = json.feed.link[l].href;
var label = raw.substr(homeUrl3.length+13);
var k;
for (k=0; k&lt;20; k++) label = label.replace(&quot;%20&quot;, &quot; &quot;);
var txt = document.createTextNode(label);
var h = document.createElement(&#39;b&#39;);
h.appendChild(txt);
var div1 = document.createElement(&#39;div&#39;);
div1.appendChild(h);
div1.appendChild(ul);
document.getElementById(&#39;data2007&#39;).appendChild(div1);
}
}
}
function search10(query, label) {

var script = document.createElement(&#39;script&#39;);
script.setAttribute(&#39;src&#39;, query + &#39;feeds/posts/default/-/&#39;
+ label +
&#39;?alt=json-in-script&amp;callback=listEntries10&#39;);
script.setAttribute(&#39;type&#39;, &#39;text/javascript&#39;);
document.documentElement.firstChild.appendChild(script);
}

var labelArray = new Array();
var numLabel = 0;

<b:loop values='data:posts' var='post'>
<b:loop values='data:post.labels' var='label'>
textLabel = &quot;<data:label.name/>&quot;;

var test = 0;
for (var i = 0; i &lt; labelArray.length; i++)
if (labelArray[i] == textLabel) test = 1;
if (test == 0) {
labelArray.push(textLabel);
var maxLabels = (labelArray.length &lt;= maxNumberOfLabels) ?
labelArray.length : maxNumberOfLabels;
if (numLabel &lt; maxLabels) {
search10(homeUrl3, textLabel);
numLabel++;
}
}
</b:loop>
</b:loop>
</script>
</div>
</div>
</div>
</b:if><!-- Related Posts Code End-->

6. Save

good luck :)

need to know! 
Blogger is a blog-publishing service that allows private or multi-user blogs with time-stamped entries. It was created by Pyra Labs, which was bought by Google in 2003. Generally, the blogs are hosted by Google at a subdomain of blogspot.com. Up until May 1, 2010 Blogger allowed users to publish blogs on other hosts, via FTP. All such blogs had (or still have) to be moved to Google's own servers, with domains other than blogspot.com allowed via Custom URLs
READ MORE >> Related Post For Blogger

Sunday, January 1, 2012

Make Application In Qt Creator (Ubuntu)

First step : Install Qt Cretor
- sudo apt-get install qtcreator (in terminal)
- or install using ubuntu software center

Second step : Make a New Project
- click Create Project
- choose Qt4 GUI Application, then click ok
- fill Name with name of the project that you create
- Create in is location you will save the project
- Then click Next

Third step : Desain Interface
- to design applications, we enter the editor and double-click mainwindow.ui adding components with drag 'n drop components to the form.
- in this tutorial we need :
   ~ 2 spin box
   ~ 2 Labels
   ~ 1 Push Button
- double-click to edit caption
- to change property of object, we look at side panel

Fourth step : Give Code
- to Give code we click-right object, click go to slot then choose event.
- so we click-right Push Button, Click go to slot then choose clicked()
- give code below MainWindow::on_pushbutton_clicked().

qint8 result= ui­>spinbox­>value() + ui­>spinbox_2­>value();
QString resultString=QString::number(result);
ui­>label­>setText(resultString);

Fiveth step : Running application
- save (CTRL + S)
- run (CTRL + R or F5)


need to know! 
Qt Creator is a cross-platform C++ integrated development environment which is part of the Qt SDK. It includes a visual debugger and an integrated GUI layout and forms designer. The editor's features includes syntax highlighting and autocompletion, but not tabs. Qt Creator uses the C++ compiler from the GNU Compiler Collection on Linux and FreeBSD. On Windows it can use MinGW or MSVC with the default install and can also use cdb when compiled from source.
READ MORE >> Make Application In Qt Creator (Ubuntu)

Followers